APC AP9605 PowerNet SNMP Adapter Username and
Password Recovery
How to find and reset the user name and/or password on the
APC AP9605 (and also the AP9606)
Introduction
 The APC AP9605 PowerNet SNMP Adapter is a SmartSlot accessory which
was sold by APC for their UPS products (it has since been
discontinued in favor of newer/more advanced cards). Basically, is a 10 Mbps
ethernet adapter which allows the UPS to communicate via SNMP instead
of having to use a serial cable connected to one computer. The
benefit of this is that multiple computers/servers can query the UPS
directly, instead of having one "master" server which is connected via
a serial cable with which the other computers must communicate.
The APC AP9605 PowerNet SNMP Adapter is a SmartSlot accessory which
was sold by APC for their UPS products (it has since been
discontinued in favor of newer/more advanced cards). Basically, is a 10 Mbps
ethernet adapter which allows the UPS to communicate via SNMP instead
of having to use a serial cable connected to one computer. The
benefit of this is that multiple computers/servers can query the UPS
directly, instead of having one "master" server which is connected via
a serial cable with which the other computers must communicate.
The AP9605 was produced sometime around the mid to late '90s, which
means it is probably considered an antique in most IT environments,
however this card still has plenty to offer those of us who are a little
lower on the IT totem pole such as small networks, home users, etc.
Unlike its successor (the AP9606), the
AP9605 does not have a web management feature; in order to configure
it, you must use the command line interface (via a serial cable or
telnet, though it is possible to disable telnet so that you need
physical access to the device for a bit more security). By shopping
around a bit on eBay, these cards can be purchased for around $5 each
in quantities of 5+ or so, or if you are just looking for a single
card, $10 seems to be about the norm. (Those prices assume used
cards; "new" ones can be considerably more expensive, given
that there are quite
a few goofball sellers out there who apparently are under the
impression that these cards are made of solid gold as opposed to being
last decade's technology.)

The default username/password for these cards is apc/apc.
One drawback to purchasing one of these cards used is that sometimes a
previous user has changed the default username and/or password. If
you cannot log in to change the networking configuration and such, the
card is useless.
One option which is available to you is to simply contact APC's
customer service department (their web site is www.apc.com). If you give them the
card's serial number, they can provide you with a backdoor password.
When you log in with the username of apc in conjunction with the
backdoor password, the username and password will be reset back to apc/apc.
This is probably the easiest option, but if you
are in a hurry, or just like doing things yourself, this page
describes how to determine the username and password for your AP9605
card and also how to reset it.
Installing the Card
In order to communicate with the card, you need to install it in a
UPS. Here is the procedure I use:
- Press the "off" button on the UPS (this will power off any connected equipment)
- Unplug the UPS
- Press the "off" button on the UPS again, only this time, hold it down until you hear a click. This will take about 3-5 seconds.
- Remove the screws and cover from the SmartSlot port, if necessary.
- Slide the AP9605 into the SmartSlot
- Install screws to secure the card in the slot if you are
leaving it there and putting the UPS into use, otherwise if you are
just testing or will be pulling cards in and out frequently, the
screws aren't necessary for it to work, just make sure the card is
fully seated. There is no need to connect an ethernet cable at this
point, the configuration will be done via the serial port.
- Plug the UPS back in. (You don't need to press the "on/test"
button, just plugging in the UPS is enough to power up the SmartSlot
port and allow you to establish a serial connection.
The reason for holding down the "off" button for 5 seconds is
because just unplugging the UPS does not de-energize it. The
SmartSlot port is still powered up until you de-energize the UPS. If
you try to install or remove a card while there is still power in the
slot, you stand a very good chance of frying the card and/or damaging
the UPS. (Note: I have seen people in forums who say that to
de-energize the UPS, you should hold down the "on/test" button for 5
seconds after unplugging the UPS, but on all of the Smart-UPS units
that I have, this doesn't do anything; only holding down the "off"
button de-energizes the unit. I don't know if the authors of those
forum posts are wrong, smoking crack, living in some parallel
universe, or some combination of the above, I'm just relaying my
personal experience to you, for what it is worth.
All I know is that
when I hold down the "off" button for a few seconds, there is an
audible "click" as it shuts off, and if there is a card installed in
the SmartSlot port with an LED on it, the light goes out at the same
time. When I hold down the "on/test" button, nothing happens and the
unit is clearly still energized.)
The Serial Connection
For my testing, I used a Smart-UPS along with an APC serial cable
(part number 940-0024C). If you don't have this cable, you can make
your own; it is a DB9 cable with a female end for the PC and a male
end for the UPS. Wire it as follows:
UPS end
(male) | | PC end
(female) |
|---|
 |
|  |
In addition, the female end should have sockets 1 and 4 connected ("shorted") together, and the same for sockets 7 and 8.
(The pinout info above is courtesy of www.allpinouts.org,
and it was confirmed by myself by probing an actual APC cable. I have
also used this info to build my own cable, prior to purchasing an SNMP
card. There are several other web sites out there with this pinout info which
you can Google for should you be so inclined.)
Once you've plugged in the cable and installed the card, fire up a
terminal program on your PC (Hyperterm comes installed by default on
most Windows machines), and configure the comm port to 2400 baud, no
parity, 1 stop bit, and no flow control. (2400,N,8,1,none) (Note:
I have come across some cards which use the same settings except the
baud rate is 19,200. I'm not sure what the deal is there. So, if
2400 just gives you garbage on the screen, try 19,200 instead. I
believe the menu is different on the 19,200 version so the technique
displayed on this page might not work. Actually, I think that the
19,200 version might not even use a username/password, in which case a reset like this may not
even be necessary.)
When you connect, you need to hit "enter" a couple of
times and you should be presented with a "User Name" prompt. The default
username is "apc", and the default password is also "apc". If you cannot
log in with those, then somebody has changed the username,
password, or both. The rest of this guide explains how to retrieve
this information.
Finding the User Name and Password
 APC built a "back door" password into the AP9605 which was apparently
used for factory configuration. When you log in using this back door
password, you are presented with a different menu than when you log in
with the normal password. One of the options on this menu is to dump
the contents of the EEPROM, and fortunately, this includes the username
and password. I will now take you step by step through the
process. In this example, the UPS has been configured with a username
of "USERNAME" and a password of "PASSWORD".
APC built a "back door" password into the AP9605 which was apparently
used for factory configuration. When you log in using this back door
password, you are presented with a different menu than when you log in
with the normal password. One of the options on this menu is to dump
the contents of the EEPROM, and fortunately, this includes the username
and password. I will now take you step by step through the
process. In this example, the UPS has been configured with a username
of "USERNAME" and a password of "PASSWORD".
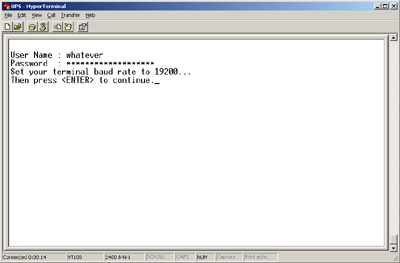
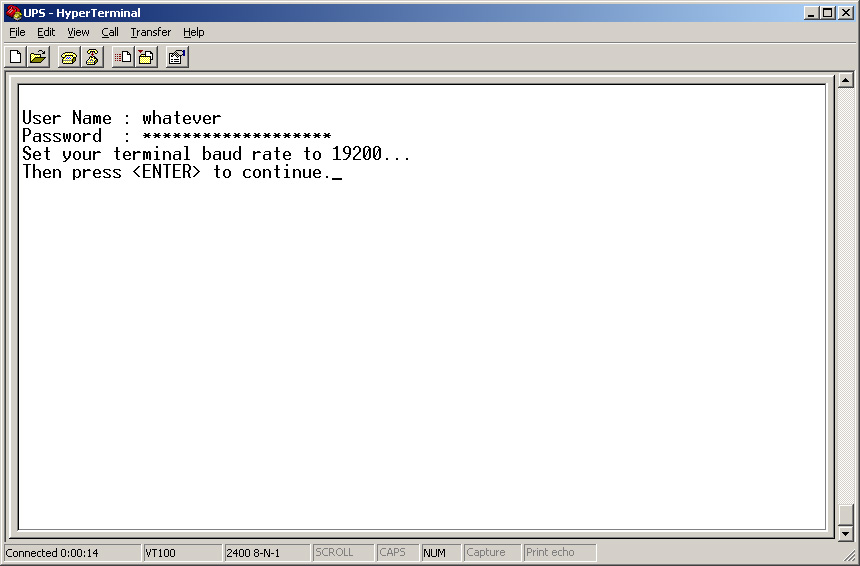
After you connect to the UPS with your terminal and get the
"User Name:" prompt, type anything you want for the username (it
doesn't matter), then for the password, use "TENmanUFactOryPOWER".
(Cut 'n paste is your friend here.)
You
will be prompted to change your baud rate to 19,200, as shown to the
right.
Disconnect, change the baud rate for your comm port to 19,200, connect, and then
hit enter. You will be presented with the menu shown
to the right.
There are a bunch of options here obviously, and it looks like there
is potential to mess up the card by choosing the wrong ones, so its
probably best to not mess with any option if you aren't sure exactly
what it does.
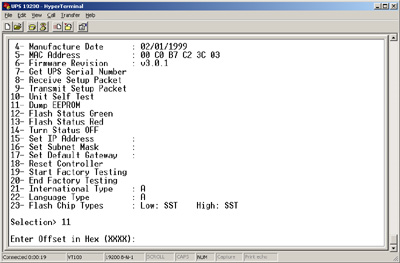
The option we are interested in is number 11, "Dump EEPROM". Choose
that, and you will be presented with a prompt that says "Enter Offset
in Hex (XXXX):"; just hit enter here.
Once you do so, you will be presented with the hex dump, one page at a
time. Hit the space bar to go to the next page, "b" to go back a
page, or any other key to exit the dump and go back to the menu.
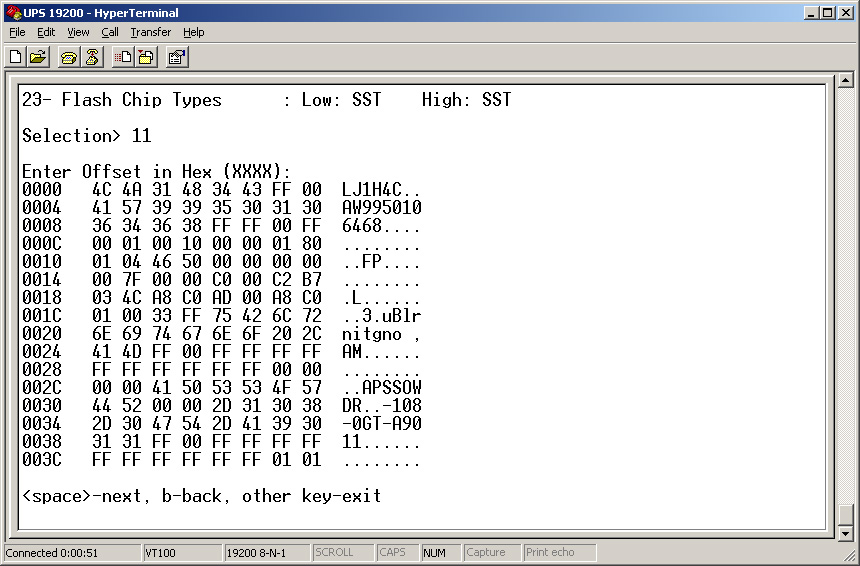
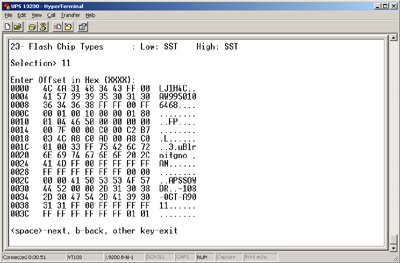 The picture to the right shows what the hex dump looks like. This is actually the
first page of the dump, and the lines we are interested in are 002C
and 0030. Look at the ASCII portion of the dump at the far right hand
side. Each line is 8 characters (columns) wide. If we were to number each
column (1 through 8), the password starts on line 002C, at
column 3, goes through column 8, then continues on the next line
(0030), starting at column 1. As you can see, the password is not
listed in order, its jumbled up. The table below will show you how to
decode the password:
The picture to the right shows what the hex dump looks like. This is actually the
first page of the dump, and the lines we are interested in are 002C
and 0030. Look at the ASCII portion of the dump at the far right hand
side. Each line is 8 characters (columns) wide. If we were to number each
column (1 through 8), the password starts on line 002C, at
column 3, goes through column 8, then continues on the next line
(0030), starting at column 1. As you can see, the password is not
listed in order, its jumbled up. The table below will show you how to
decode the password:
Password
Character | Location | Example |
|---|
| 1 | Line 002C, column 4 | P |
| 2 | Line 002C, column 3 | A |
| 3 | Line 002C, column 6 | S |
| 4 | Line 002C, column 5 | S |
| 5 | Line 002C, column 8 | W |
| 6 | Line 002C, column 7 | O |
| 7 | Line 0030, column 2 | R |
| 8 | Line 0030, column 1 | D |
| 9 | Line 0030, column 4 | . |
| 10 | Line 0030, column 3 | . |
If there is no data in a particular memory location, a period will be displayed. The
maximum allowed password length is 10 characters so
basically what you need to do is to grab a piece of paper and put 10 blanks on it, numbered
1 through 10. Using the table above, simply start at 002C, column 4, and write that character
in spot 1, write the character on line 002C, column 3 in blank 2, and so on. Keep going until
you get to Line 0030, column 3, or until you hit a period. (If you hit a period, that means
the password is less than 10 characters, and that period signifies the end of the password.)
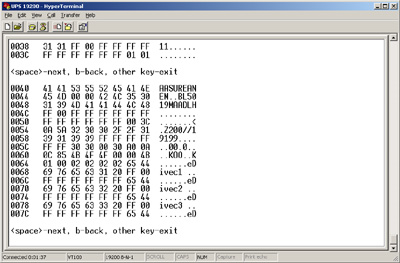 The procedure for finding the username is the same as for the password, except that it is located on lines 0040 and 0044. The "decoding sequence" is the same as for the password, except for the line numbers, thus:
Username
Character | Location | Example |
|---|
| 1 | Line 0040, column 4 | U |
| 2 | Line 0040, column 3 | S |
| 3 | Line 0040, column 6 | E |
| 4 | Line 0040, column 5 | R |
| 5 | Line 0040, column 8 | N |
| 6 | Line 0040, column 7 | A |
| 7 | Line 0044, column 2 | M |
| 8 | Line 0044, column 1 | E |
| 9 | Line 0044, column 4 | . |
| 10 | Line 0044, column 3 | . |
A note for AP9606 users: I received an e-mail from a Mr. David Fulmer who
informed me that this procedure also works for the AP9606, however the
username starts at offset 0x01D3 and the password starts at offset
0x01DE. Thanks, David!
Once you've got the username and password, go back to the main menu and hit CTRL-A to exit
the factory backdoor menu. At this point, it will prompt you to
change the baud rate back to 2400.
Use the same procedure as before - disconnect, set the comm port to 2400 baud, reconnect, and hit enter.
Setting a New User Name and/or Password
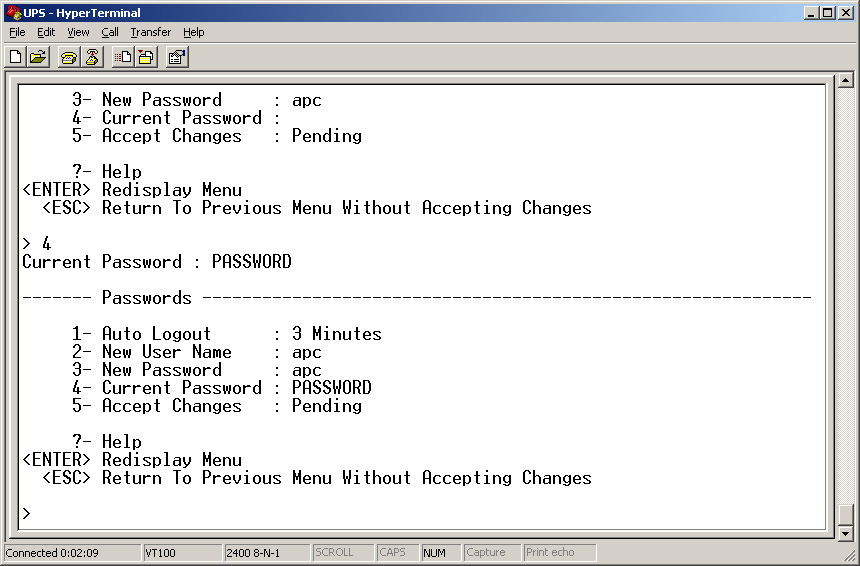
Now that you know the username and password, when you connect to the
UPS with your terminal program and are presented with the username and password prompts, you can input the correct
values. Once you are logged in, you can reset the username and/or password to
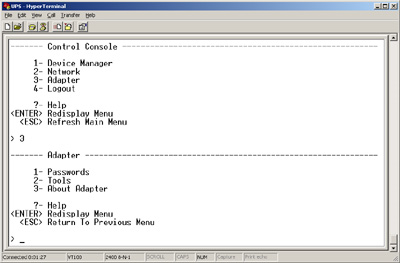
those of your choosing. To do so, choose menu option 3 ("Adapter"), and then menu option 1
("Passwords").
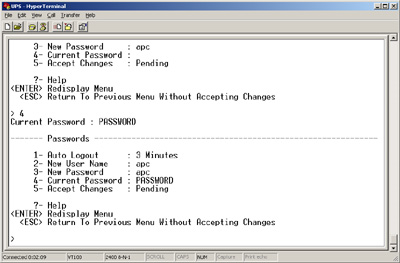
On the menu which is presented, if you want to set a new username, choose option 2,
then type the new user name. Use option 3 to input a new password, and then choose
option 4 and input the current password (the one that is currently set in the card, the one you
just used to log in). Once you have input the values you want, choose option number 5
("Accept Changes").
In the example to the right, I am setting the new username to be "apc" and the new
password to be "apc". (The old/existing password was "PASSWORD".)
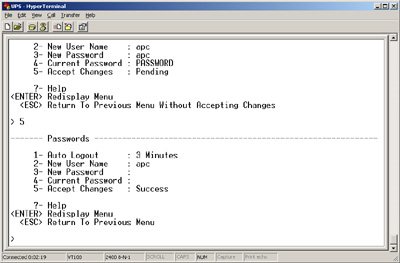
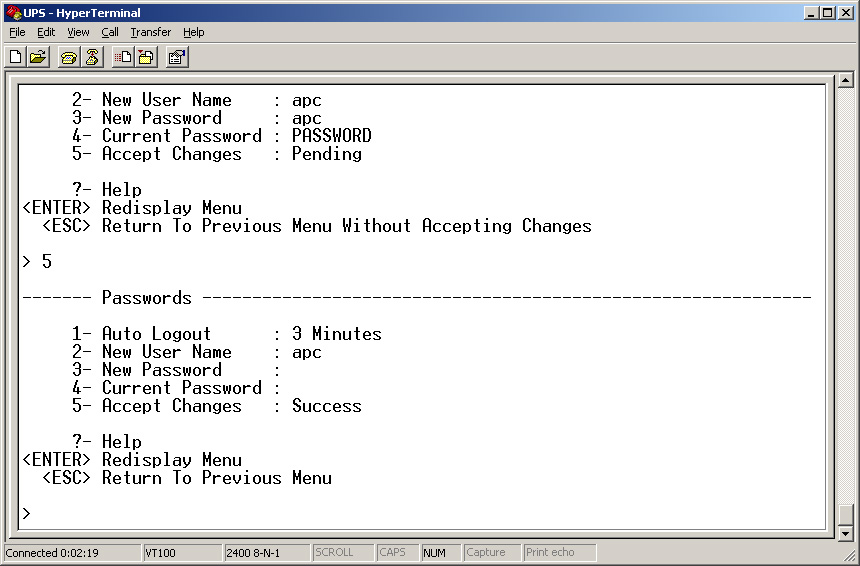
After you choose menu option 5, if you have entered the correct value in the "Current
Password" field, menu option 5 should change from "Pending" to "Success".
At this point, you can escape back to the main menu and log out. You should now be able
to log in using the new username and password you have chosen; give it a try.
Congratulations! You've just turned an expensive paperweight into a useful piece of networking
equipment.
I hope you found this helpful! My purpose for making this
information available is simply to help out other folks who might be in the
same situation I recently found myself in. I had purchased some used
cards, and the username/password had been changed on some of them. I was able to
find some information online regarding using this EEPROM dump trick on other APC
SNMP adapters, but the information provided did not apply to the AP9605. By
playing around with a card that I was able to login to and studying the EEPROM dump,
I was able to develop the above procedure for recovering the username and password. Since
there did not appear to be any other info out there regarding how to do this on
an AP9605, I figured I would build a web page around it just in case
it may be useful to someone. (Plus, I figured that by building this
web page, I'd have a record of the
procedure, so when I forget how this is done, I won't have to
reinvent the wheel next time I need to reset one of these cards.)
If this page has saved you some money, time, and/or frustration and
you feel like expressing your gratitude in a monetary form, I would certainly
not be beneath accepting a donation of whatever amount you feel is appropriate.
I can accept a PayPal payment
to jon@jonsteiger.com.
Good luck!
This page was last updated October 15, 2009
 APC built a "back door" password into the AP9605 which was apparently
used for factory configuration. When you log in using this back door
password, you are presented with a different menu than when you log in
with the normal password. One of the options on this menu is to dump
the contents of the EEPROM, and fortunately, this includes the username
and password. I will now take you step by step through the
process. In this example, the UPS has been configured with a username
of "USERNAME" and a password of "PASSWORD".
APC built a "back door" password into the AP9605 which was apparently
used for factory configuration. When you log in using this back door
password, you are presented with a different menu than when you log in
with the normal password. One of the options on this menu is to dump
the contents of the EEPROM, and fortunately, this includes the username
and password. I will now take you step by step through the
process. In this example, the UPS has been configured with a username
of "USERNAME" and a password of "PASSWORD".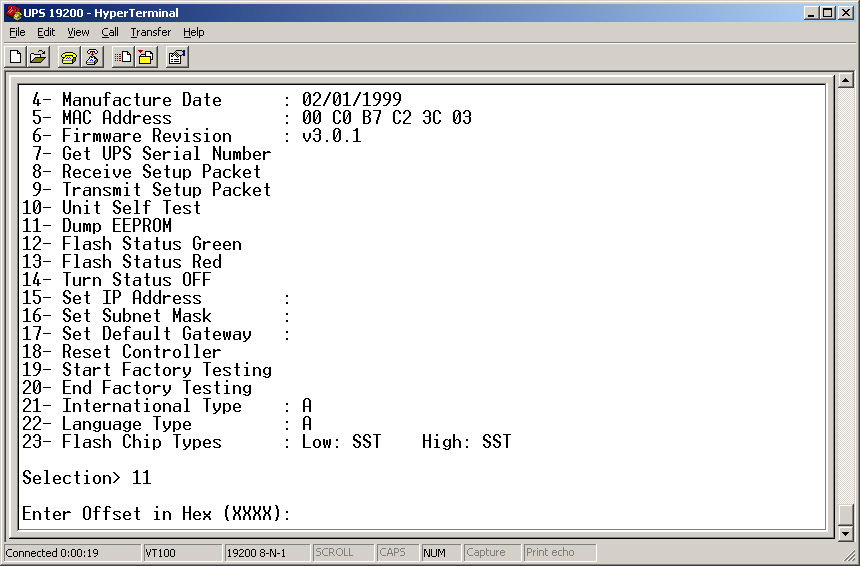
 The picture to the right shows what the hex dump looks like. This is actually the
first page of the dump, and the lines we are interested in are 002C
and 0030. Look at the ASCII portion of the dump at the far right hand
side. Each line is 8 characters (columns) wide. If we were to number each
column (1 through 8), the password starts on line 002C, at
column 3, goes through column 8, then continues on the next line
(0030), starting at column 1. As you can see, the password is not
listed in order, its jumbled up. The table below will show you how to
decode the password:
The picture to the right shows what the hex dump looks like. This is actually the
first page of the dump, and the lines we are interested in are 002C
and 0030. Look at the ASCII portion of the dump at the far right hand
side. Each line is 8 characters (columns) wide. If we were to number each
column (1 through 8), the password starts on line 002C, at
column 3, goes through column 8, then continues on the next line
(0030), starting at column 1. As you can see, the password is not
listed in order, its jumbled up. The table below will show you how to
decode the password: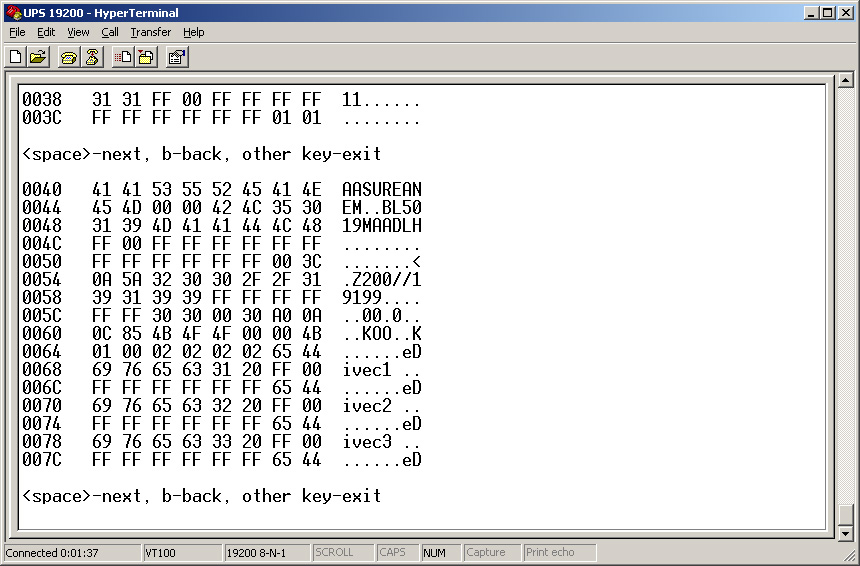 The procedure for finding the username is the same as for the password, except that it is located on lines 0040 and 0044. The "decoding sequence" is the same as for the password, except for the line numbers, thus: